Inserindo
um Objeto Heliodon
Inserindo
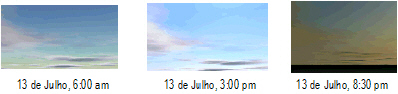
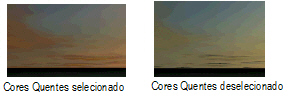
um Objeto HeliodonA ferramenta Heliodon, disponível no Vectorworks Design Series, insere em um desenho uma ou mais luzes direcionais especiais para a realização de estudos solares, de cálculos de ângulos de sombra e para a criação de animações solares. A ferramenta demonstra a posição da luz solar e as sombras refletidas no modelo à medida que a posição do sol se modifica, para qualquer dia do ano e qualquer lugar da Terra. Informações precisas referentes à cidade ou região são usadas nos cálculos. Os ângulos vertical e horizontal das sombras podem ser calculados automaticamente para que você possa determinar o posicionamento correto de dispositivos que gerem sombra, como basculantes. Ao combinar isto com um fundo de céu físico, o heliodon pode criar uma iluminação natural que responde à posição do sol e ao horário do dia. Além disso, uma área do desenho como uma janela ou uma parte de um modelo maior podem ser estudadas para determinar quando (e se) a luz solar o afetará. As animações solares poderão ser vistas na tela ou exportadas para um arquivo de filme.
Para exibir as sombras é necessário ter o Renderworks instalado. Para exibir sombras suavez é necessário usar um modo de apresentação Renderworks.
Clique aqui para assistir a um vídeo sobre o assunto (é necessário ter conexão com a internet).
~~~~~~~~~~~~~~~~~~~~~~~~~
Inserindo
um Objeto Heliodon
Para inserir um heliodon:
1. Clique na ferramenta Heliodon no conjunto de ferramentas de Visualização.
Se esta for a primeira vez em que você insere um heliodon no desenho, a janela de Configurações será exibida. Selecione as preferências que você deseja usar nesta sessão com esta ferramenta. (Caso contrário, clique em Preferências na barra de ferramentas para especificar ou alterar os parâmetros da ferramenta.)
Clique para exibir ou esconder os parâmetros.
2. Clique em OK.
3. Clique uma vez no desenho para definir a posição do objeto. Clique novamente para definir a rotação.
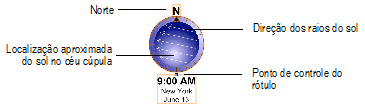
O heliodon mostra o Norte verdadeiro em seu topo. Normalmente o desenho está orientado ao Norte da página (o Norte verdadeiro, e não o Norte magnético), e o Norte verdadeiro corresponde ao topo da página sem a necessidade de compensação para a posição correta do sol. Se o desenho não tiver sido criado nesta orientação, use a paleta Informações de Objeto para definir uma rotação em graus a partir do Norte da página. O Norte definido aqui deve corresponder ao Norte no desenho.
A seta branca representa a direção da luz do sol no horário atual e na localização escolhida. O destaque em gradiente exibe a posição aproximada do sol no céu.
4. Altere as propriedades do heliodon usando a paleta Informações de Objeto se necessário.
Clique para exibir ou esconder os parâmetros.
Once placed, a heliodon symbol is added to the drawing file and is listed in the Resource Browser in the Heliodon Symbols folder. Edit the 2D component of the symbol as described in “Editing Symbol Definitions” on page 243 to change the appearance or the font style or size.
Heliodon objects display in, and can be controlled from, the Visualization palette. They can be identified by their location and time data.
Place several heliodon objects in the drawing, set to different times of day, to conduct a solar study. Turn the heliodon objects on and off in the Visualization palette to study the effects of the sun’s light and shadows cast at different times of day.
~~~~~~~~~~~~~~~~~~~~~~~~~
 Creating
Solar Animations
Creating
Solar AnimationsA solar animation illustrates the way the sun moves over, or shadows are cast upon, a project as the sun’s position changes. It studies how the sun affects a model or site at a particular time of day or year. The animation can be set to rotate the sun about the model, or the model can rotate about the layer plane center or heliodon object.
Solar animations can be interactive, observing the effects in the drawing as changes are made. To interactively view changes as you move the sliders, render in Wireframe or OpenGL render mode. The solar animation can also be exported to a .mov file.
Depending on the view, render mode, presence of shadows, and heliodon view, various solar assessments can be conducted. Generally, OpenGL rendering (with or without shadows; Renderworks required) will provide good results.
Settings |
Solar Animation Effect |
|---|---|
Wireframe, Top/Plan view |
Observe the heliodon symbol while changing the time of year or time of day. Animating shows the position of the sun’s rays and approximate position of the sun in the sky dome. The date display on the heliodon label changes to indicate the animation’s day of the month. |
OpenGL rendering (Use Shadows not selected), Top/Plan or 3D view |
Observe the model as the sun’s rays move over it during the course of the year or day. Different portions of the model are illuminated by sunlight. |
OpenGL rendering with shadows (Use Shadows selected), Top/Plan view or 3D view |
Observe the shadows cast by the model over the course of the day or year, and observe the portions of the model that are illuminated by sunlight. |
Solar animation view set to View (sun to layer plane center) or View (sun to Heliodon center) |
Observe as the model rotates, as if the viewer was positioned on the sun. Any visible surface has sunlight falling on it, while anything that can’t be seen is in shadow (therefore, Use Shadows is not necessary). The model rotates about the layer plane center or about the heliodon center. Rotating about the heliodon center can be useful when the model is not centrally located, or when a particular part of the model needs to be studied. For example, place the heliodon adjacent to a shading device, zoom in, and then animate using the heliodon center. |
Click here for a video tip about this topic (Internet access required).
~~~~~~~~~~~~~~~~~~~~~~~~~
 Creating
Interactive Solar Animations
Creating
Interactive Solar AnimationsInteractive solar animations display the sun’s effects within the drawing; specify the view, day, month, and time for interactive previews. Wireframe mode views as well as rendered views (with or without shadows) are useful to study the sun’s movements.
Large or complex rendered models, high-quality render settings, and smooth shadows may affect the animation. To interactively view changes as you move the sliders, render in Wireframe or OpenGL render mode. Low to medium (Detail and Quality) OpenGL options are recommended.

To animate the sun interactively:
1. Insert at least one heliodon object as described in “Inserindo um Objeto Heliodon” na página 1485.
2. Select the desired view and render mode.
3. Select the heliodon, and click Solar Animation from the Object Info palette. Alternatively, double-click on a heliodon object.
The Solar Animation dialog box opens. Click on the Interactive tab. Set the Animate view, and the day, month, and time, or move the month and day sliders while observing the effects.
Click to show/hide the parameters.
4. When finished with the solar animation, click OK.
~~~~~~~~~~~~~~~~~~~~~~~~~
 Exporting
Solar Animations
Exporting
Solar AnimationsThe same type of solar animation effects that can be seen in the drawing in interactive mode can be exported to a movie.

To export a solar animation:
1. Insert at least one heliodon object as described in “Inserindo um Objeto Heliodon” na página 1485.
2. Select the desired view and render mode.
3. Select the heliodon, and click Solar Animation from the Object Info palette. Alternatively, double-click on a heliodon object.
The Solar Animation dialog box opens.
4. Click on the Interactive tab, and set the date and time.
5. Click on the Export Movie tab. Set the Animate view and the export options. The solar animation occurs based either on time or date settings.
Click to show/hide the parameters.
6. Click OK to create the animation.
If showing the time of day or month and day, click in the drawing, when prompted, to set the text location.
The Set Movie Name and Destination dialog box opens.
7. Specify the location to save the movie file. By default, the file is named with the location and the date. Click Save.
The Compression Settings dialog box opens.
8. Set the Frames per second and Quality for the movie file.
9. Click OK. A message displays the progress of the export, and the movie is created.
Click to end the export early. The solar animation movie is created up to that point.
10. View the movie in the application of your choice to watch the solar animation.
~~~~~~~~~~~~~~~~~~~~~~~~~
 Calculating
Shadow Angles
Calculating
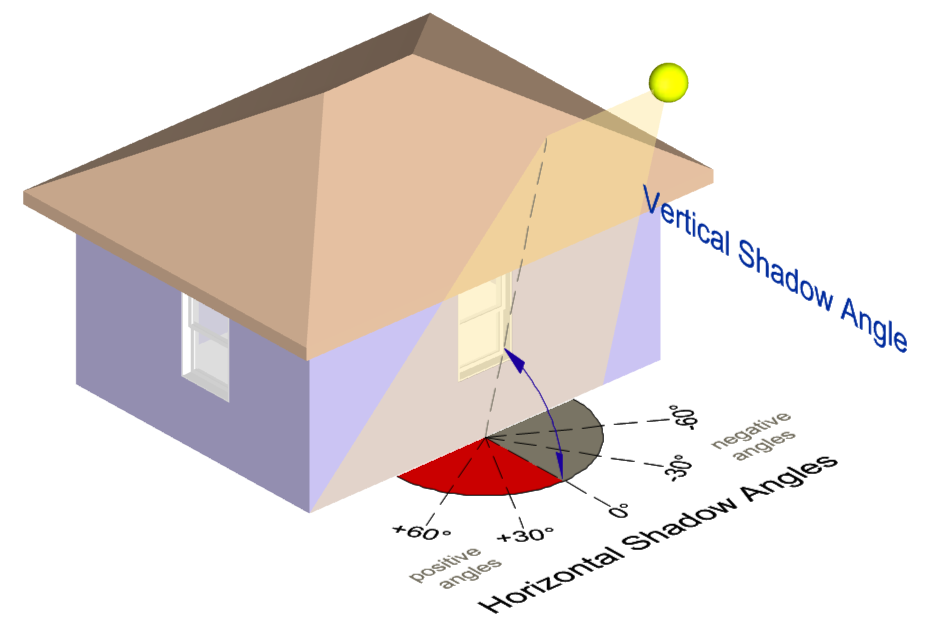
Shadow AnglesShadow angles can be calculated and displayed for up to four walls of a model. These calculations are useful for designing or positioning shading devices, such as awnings and overhangs.
Shadow angles are always calculated relative to a wall and not to true North.

To calculate shadow angles:
1. Name the wall or walls that will participate in the calculations by selecting each wall, and then clicking on the Data tab of the Object Info palette. Enter a Name for the wall to identify it.
2. Insert at least one heliodon object as described in “Inserindo um Objeto Heliodon” na página 1485.
3. Select the heliodon. In the Object Info palette, select Show Shadow Angle Calculator.
4. Specify the No. of Walls to display shadow angle calculation values. Up to four walls can be specified.
5. In Wall Face, specify which side of the walls, left or right, is the external side.
By default, the wall direction as it was drawn determines which side of the wall is considered the outside and which is the inside. See “Wall Direction” on page 502.
6. Enter the exact Name of each wall.
When the wall name is recognized, its Horizontal Shadow Angle (HSA) and Vertical Shadow Angle (VSA) calculated values are displayed in the Object Info palette. If a wall is always in shadow, the text No sun on wall displays in the Object Info palette.
~~~~~~~~~~~~~~~~~~~~~~~~~