 ODBC WorkflowODBC Workflow
The Vectorworks Design Series products include the ability to communicate with external databases according to Open Database Connectivity (ODBC) standard. Using ODBC, a set of data can be used to automatically update the records attached to objects. Similarly, Vectorworks objects can send object data to a database, updating it. To successfully use ODBC in Vectorworks Design Series products, a database management system is required, and steps need to be followed to set up the connection and manage the data flow.
1. Configure and set up data in the database program of your choice. Database connectivity in Vectorworks software is supported for the following database systems:
• Microsoft Excel
• FileMaker Pro
• Microsoft Access
• MySQL
• SQLite*
• Any database that supports ODBC and has either Mac or Windows drivers
Database and/or operating systems typically include a separate ODBC Administrator or Manager application, which defines drivers and data sources. Database drivers may need to be installed. See “ODBC Driver Information” on page 1810.
The installation, setup, and usage of database systems is beyond the scope of this help system and is not described here. Please consult the documentation related to your operating system or database software for information.
* SQLite database files do not require an ODBC manager or server. For information on SQLite, visit http://www.sqlite.org
2. Set up the connection between Vectorworks software and the database system. A “key” column with unique values is designated, to establish and maintain the communication between the database system and Vectorworks record formats.
3. Identify the object instances of each type of object to be connected, and define the link between the database and the record formats of the object types.
4. When connections have been established, determine the settings to update the Vectorworks record formats from the database, and to update the database from the Vectorworks object records. The two-way communication process can be automated.
~~~~~~~~~~~~~~~~~~~~~~~~~
 Database-Vectorworks
Communication
Database-Vectorworks
CommunicationThe values in a database link to the record fields of an object instance through a series of connections made between the database software and the Vectorworks software (Vectorworks Design Series required).
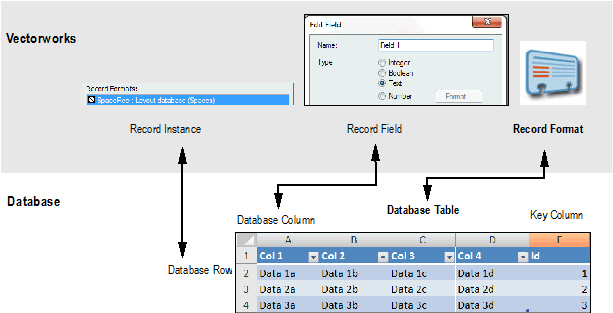
One or more columns of the database table must have unique values. These Key columns are used by the Vectorworks program to uniquely identify the database rows.
Database setup consists of identifying the key column(s) and setting up each type of connection, and then specifying update settings for the flow of data.
~~~~~~~~~~~~~~~~~~~~~~~~~
 Database Setup
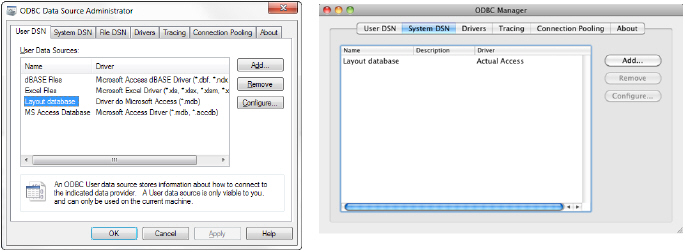
In Vectorworks Design Series products, open the ODBC Data Source Administrator (Windows) or ODBC Manager (Mac). The standard drivers may already be installed for the major database providers; verify this on the Drivers tab. More information on drivers is available in “ODBC Driver Information” on page 1810. Add the database file, providing a name for it. This makes the database available through the ODBC administrator.
SQLite database files do not require an ODBC manager, so setting up the database drivers is not necessary.
~~~~~~~~~~~~~~~~~~~~~~~~~
 Database Connection
In the Vectorworks file, connect the database to the file (Vectorworks Design Series required), and then select a Key identifier for each data source.
To establish the connection between the database and the Vectorworks file:
1. Open the Vectorworks drawing. Database connection information is saved in the Vectorworks file.
2. Select Tools > Database > Manage Databases.
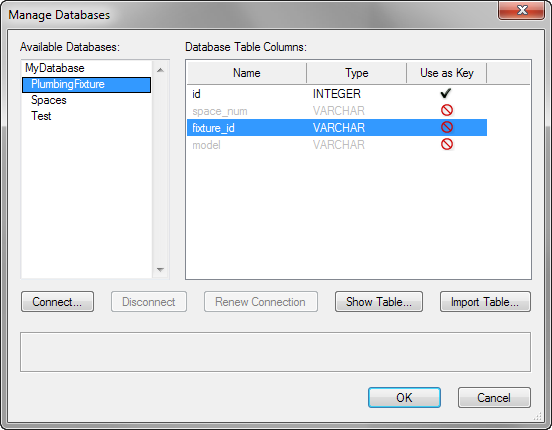
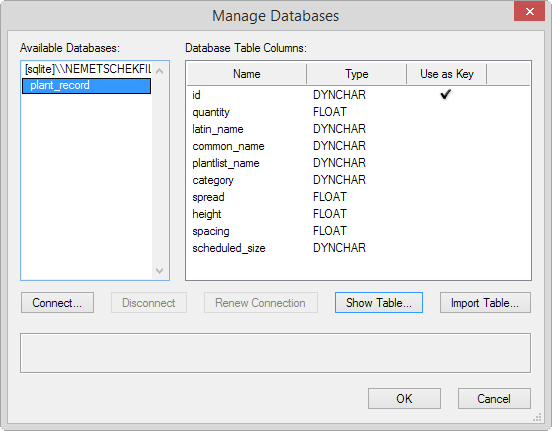
The Manage Databases dialog box opens. Through this dialog box, manage available databases and connect the desired database or databases to the current file.
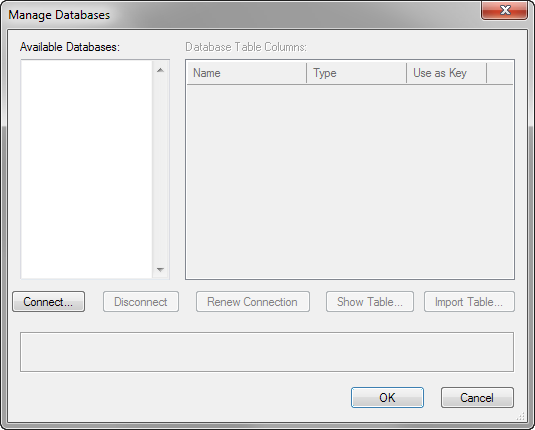
3. Since the connection has not yet been made, the Available Databases list is empty. Click Connect.
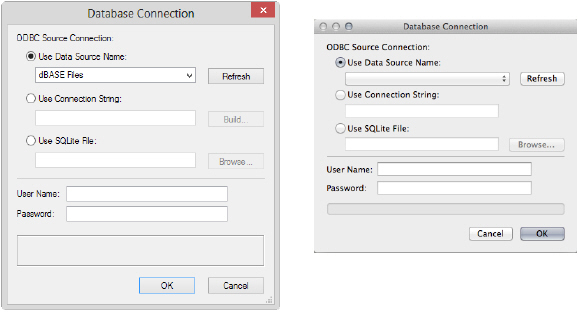
The Database Connection dialog box opens.
Click to show/hide the parameters.
4. Either select the SQLite file, or the named database added to the ODBC manager/administrator earlier, enter a User Name and Password if required, and click OK.
5. The selected database is added to the list of available databases in the Manage Databases dialog box. The tables associated with the Layout database are listed on the left, with the database table columns listed on the right.
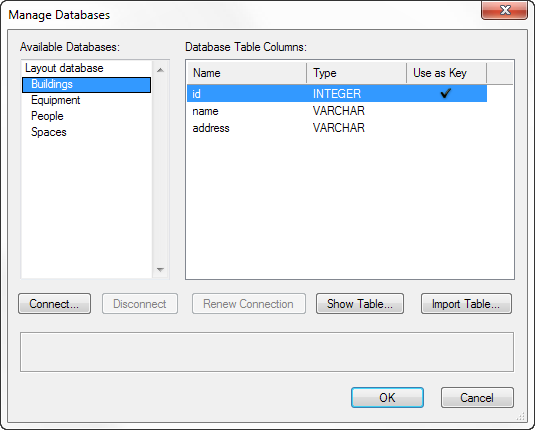
6. Select one of the available database tables; its rows display on the right. Select one of the rows to serve as the Key identifier by clicking in the Use as Key column for that row. The Key column uniquely identifies the data rows in the table. By default, this is one of the columns with unique data, used as a row identifier.
The ability to select the Key depends on the database driver. If needed, click Show Table to display the table’s contents and help select an appropriate Key.
7. Select the Key identifier for any other database tables. Each table must have at least one column selected as Use as Key.
8. Click Connect if there are other databases to connect, and identify the Key for each additional table.
9. Once the database tables have been selected and connected, and the Key identifier(s) set for each table, click OK.
The data sources have now been properly connected and identified for the file.
If the connection to the database becomes out of date, select the database and click Renew Connection to re-establish the database connection. Table and column information data is updated.
If there are problems connecting to the database, an error message provides troubleshooting information. Click Details to open a log file in the default text editor application. The log file provides further information to help diagnose connection errors.
~~~~~~~~~~~~~~~~~~~~~~~~~
 Record
Format Database Connection
Record
Format Database ConnectionEach field of the record format needs to be mapped to the appropriate database table column (Vectorworks Design Series required). The record connections can be saved in an xml file and imported into another file.
Record formats can be automatically created and linked to the database table; see “Automatically Creating Record Formats from a Database Table” on page 1803.
To connect the desired record format to the database table:
1. Select Tools > Database > Record Format Connection. Alternatively, select a record format in the Data tab of the Object Info palette for a selected object with the desired record attached, and then click Record Format Database Connection.
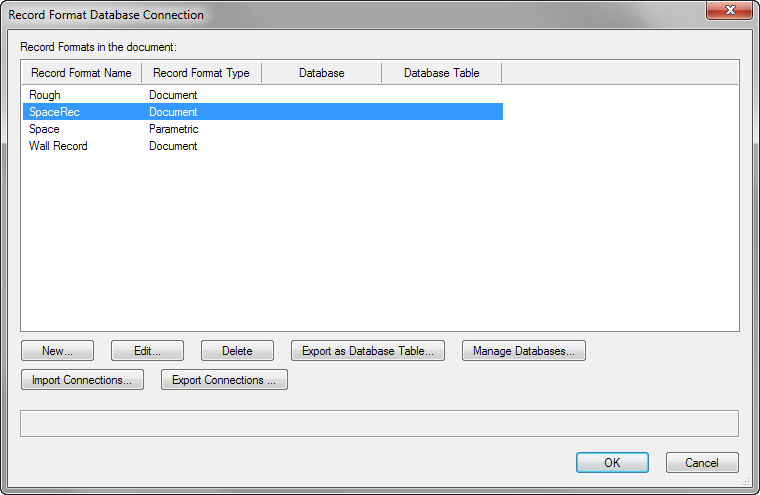
The Record Format Database Connection dialog box opens, showing available record formats and parametric objects in the file. Each record format can be linked to a data source that has already been connected to the file.
Click to show/hide the parameters.
2. Select the record format and click Edit.
The Edit Record Format dialog box opens, with additional database controls available due to the presence of the database connection.
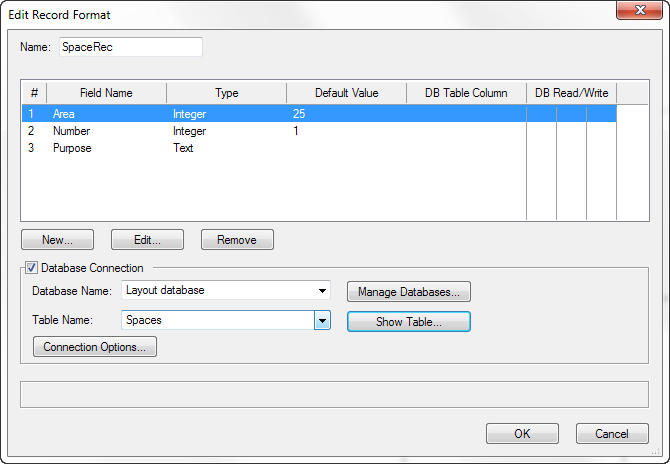
3. Select Database Connection to link the record format fields to the selected database and table. This area only displays for record formats when a database is connected in the file.
If needed, verify or change the connected database by clicking Manage Databases, or check the table selected in Table Name to view the table contents.
4. Click Connection Options to specify database connection update options.
The Connection Options dialog box opens. Select the actions to occur in the database table when the connected record format, or object with the record attached, is edited. (These changes occur at the time of database update set in “Specifying Update Settings” on page 1809; alerts inform you of any changes to the database.)
5. Click OK to return to the Edit Record Format dialog box.
Click to show/hide the parameters.
6. For each record field, assign a database table from the selected database. Select a record field and click Edit.
The Edit Field dialog box opens.
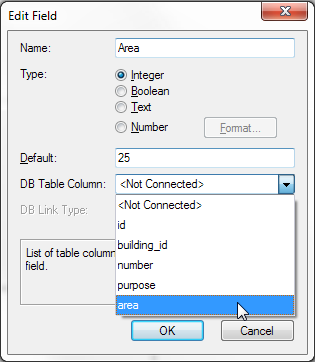
7. Select the associated table row from the database in DB Table Column, and select the method of database communication in DB Link Type:
• Read/Write: Allows data to move in both directions between the database and the Vectorworks file
• Read Only: Allows database information to be read into the Vectorworks file, but does not allow record data to modify the database
• Write Only: Allows the Vectorworks file data to modify the database, but does not allow the database information to modify the Vectorworks record field
8. Click OK to return to the Edit Record Format dialog box. The dialog box updates to display the associated table data and link type.
Click in a DB Read/Write column to easily change the link type for the selected row.
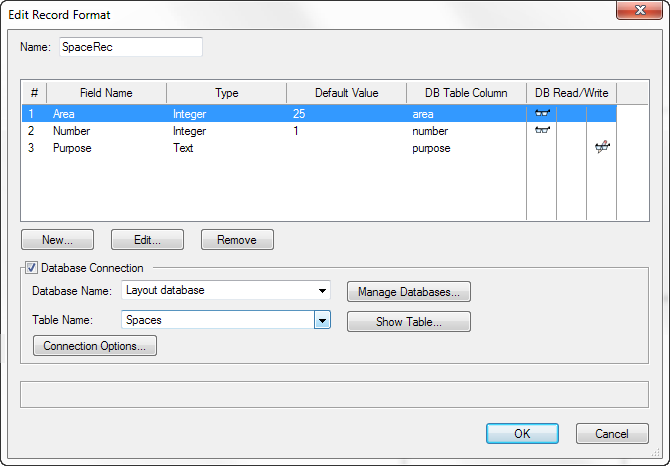
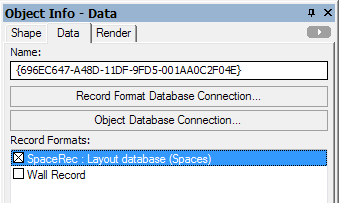
9. Once the data has been linked for each record field, click OK. The fields in the record format have now been linked to the table data in the specified database, and the link type has been defined. On the Data tab of the Object Info palette, connected record formats display with the name of the connected database and its table.
~~~~~~~~~~~~~~~~~~~~~~~~~
 Object Database Connection
The final step in setting up a database connection (Vectorworks Design Series required) is to connect object instances to the database. Once connected, the connection can be edited. The connection can also be removed.
~~~~~~~~~~~~~~~~~~~~~~~~~
 Single
Object Connection
Single
Object ConnectionTo connect a database to an object (Vectorworks Design Series required):
1. Select an object.
2. On the Data tab of the Object Info palette, click the box for the selected format to attach the record format to the object instance. (See “Attaching Record Formats to Symbols and Objects” on page 260.)
The Record Fields display with default values from the record format.
3. Select Tools > Database > Object Connection. Alternatively, click Object Database Connection from the Data tab of the Object Info palette.
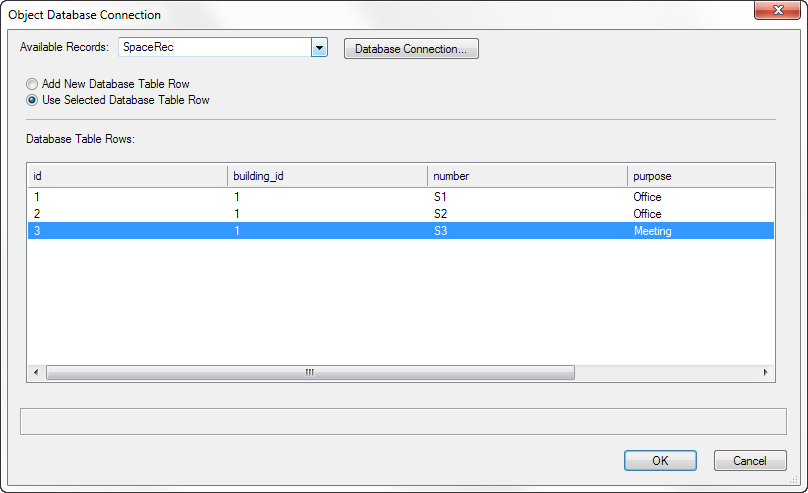
The Object Database Connection dialog box opens. If a row was previously selected for the object, it appears highlighted and bolded.
Click to show/hide the parameters.
4. Click Use Selected Database Table Row, and then select the appropriate row for the selected object.
5. Click OK.
6. The record fields are populated from the database table for the record instance attached to the object.
~~~~~~~~~~~~~~~~~~~~~~~~~
 Multiple
Object Connection
Multiple
Object ConnectionWhen there are multiple similar objects that should be identically connected to database tables through attached record formats, it would be tedious to connect each one. The connection for multiple objects can be made at one time (Vectorworks Design Series required).
To connect a database to multiple objects:
1. Select several objects of the same type; for example, select several space objects.
2. Select Tools > Database > Object Connection. Alternatively, click Object Database Connection from the Data tab of the Object Info palette.
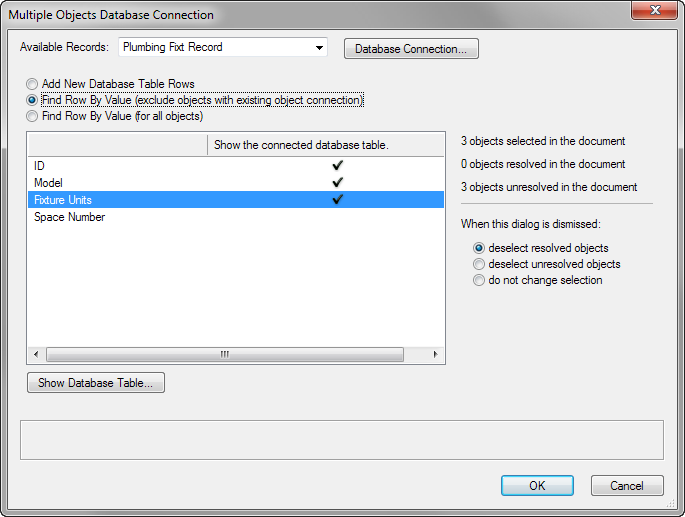
The Multiple Objects Database Connection dialog box opens. By selecting a format field and selecting search filter criteria, the table rows associated can be searched.
Click to show/hide the parameters.
3. Select a Format Field, and then click in the Find by Value column to select the field as a search filter.
4. On the right, the status of resolved objects indicates how many of the selected objects had data found in the database tables based on this search. When objects are resolved, their record field data is properly connected to the database table.
5. Click OK. For each resolved object, the record fields are populated from the database table for the record instance attached to the objects.
Resolved objects are connected to the corresponding rows using the Key identifier, and then each row is associated with the corresponding object.
~~~~~~~~~~~~~~~~~~~~~~~~~
 Editing
Object Connections
Editing
Object ConnectionsThe read/write queries of an object connection can be viewed and edited for one or several selected objects (Vectorworks Design Series required).
To edit object connections:
1. Select one or more objects. The objects should already be connected to a database.
2. Select Tools > Database > Edit Object Connection.
The Edit Object Connection dialog box opens. The reading and writing SQL queries for the selected object(s) display and can be edited, either individually for each selected object, or for all the objects at once.
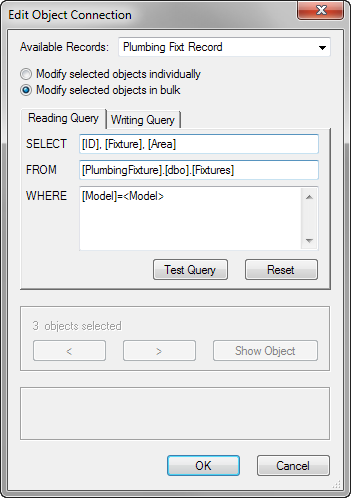
Click to show/hide the parameters.
3. View or edit the object connection information, and then click OK.
If there are validation problems, an error message provides information. The cursor is automatically placed in the field where the problem exists to help identify the problem.
~~~~~~~~~~~~~~~~~~~~~~~~~
 Removing
Object Connections
Removing
Object ConnectionsThe connection between an object and a database can be removed (Vectorworks Design Series required).
To remove object connections:
1. Select one or more objects. The objects should already be connected to a database.
2. Select Tools > Database > Remove Object Connection.
The database is disconnected from the object(s).
~~~~~~~~~~~~~~~~~~~~~~~~~
 Automating
Database Connection Workflows
Automating
Database Connection WorkflowsIn the Vectorworks Design Series, the functionality for connecting to a database and then establishing object/record format database linking contains built-in automation features to make the job easier. While it is still necessary to know how to accomplish the steps manually, dynamic updating between the Vectorworks file and the connected database allows record formats to be automatically created from a database table, and database tables to be automatically created from record formats. Connections are automatically established, and remain up to date.
~~~~~~~~~~~~~~~~~~~~~~~~~
 Automatically
Creating Record Formats from a Database Table
Automatically
Creating Record Formats from a Database TableRecord formats can be created from database tables (Vectorworks Design Series required). The imported tables are automatically linked to the new record formats.
To create record formats from a table in a connected database:
1. Select Tools > Database > Manage Databases.
The Manage Databases dialog box opens.
2. Select the database on the left, and then click Import Table.
The Import Table dialog box opens.

Click to show/hide the parameters.
3. Select the columns from the database that will become record fields in the new record format by placing a check mark in the left column. For each selected column, specify the record field name, type, and connection type. For more information on connection types, see “Record Format Database Connection” on page 1792.
4. Click OK.
Each selected table column in the database table becomes a record field in the new record format. The record fields are automatically connected to the database according to the connection type specified.
~~~~~~~~~~~~~~~~~~~~~~~~~
 Automatically
Creating a Database Table from a Record Format
Automatically
Creating a Database Table from a Record FormatDatabase tables can be created from record formats (Vectorworks Design Series required). These steps quickly create a database table and link objects to it:
• Connect to a database as described in “Database Connection” on page 1789. Connecting to an empty sql database is the easiest method.
• Select the record format and create the database rows as described in the following steps.
• Connect the objects with that record format to the database table as described in the following steps. The new tables are automatically linked to the record formats.
To create a database table from a record format:
1. Select Tools > Database > Record Format Connection.
The Record Format Database Connection dialog box opens, listing the record formats available in the current file.
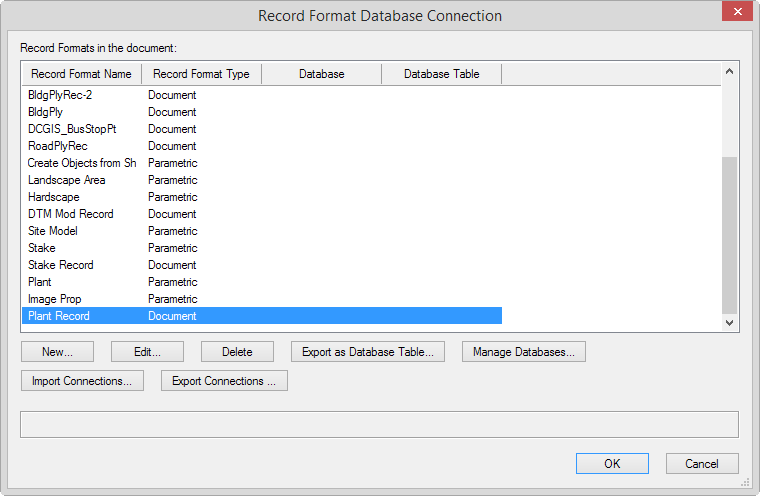
2. Select the record format, and then click Export as Database Table.
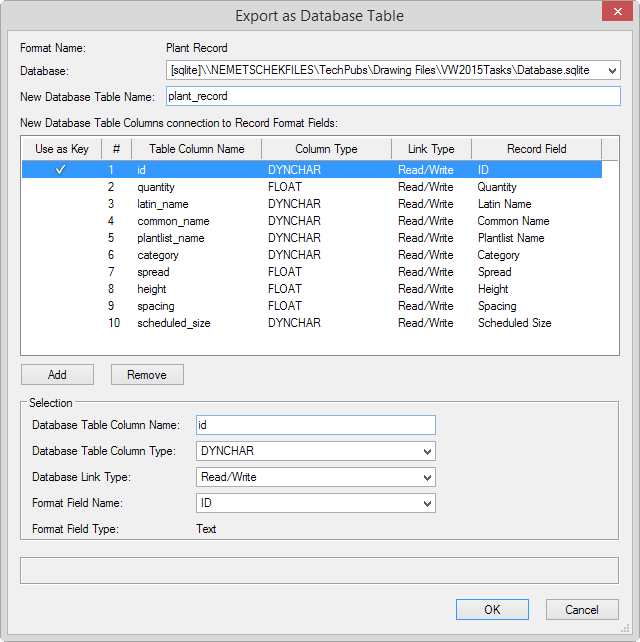
The Export as Database Table dialog box opens.
Click to show/hide the parameters.
3. Specify the parameters of the database table columns to be created. The columns will be created in the order listed; to change the order of a database table column, click and drag within the # column.
4. Click Close to return to the Export as Database Table dialog box and make any further necessary table column adjustments.
5. Click OK.
Each record field in the format becomes a column in the new database table.
6. The database rows are currently empty; the objects in the drawing need to be connected to the table to fill in the data. In this example, the plant record database table was created, so plants in the drawing need to be connected. Select all plants in the drawing.
Use the Select Similar tool to easily select all objects of a particular type that should be connected to the database.
7. Select Tools > Database > Object Connection.
Since several objects were selected, the Multiple Objects Database Connection dialog box opens.
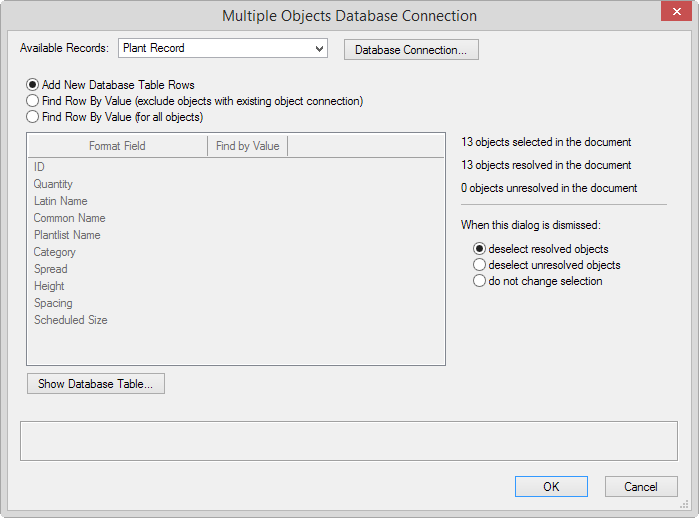
8. Select the applicable record from the Available Records list, and then select the Add New Database Table Rows option.
9. Click OK.
10. To verify that the database rows exist and have been populated with data, select Tools > Database > Manage Databases. The database rows have been created for the selected record format.
11. Click Show Table.
A dialog box opens, showing the database table for the associated record format.
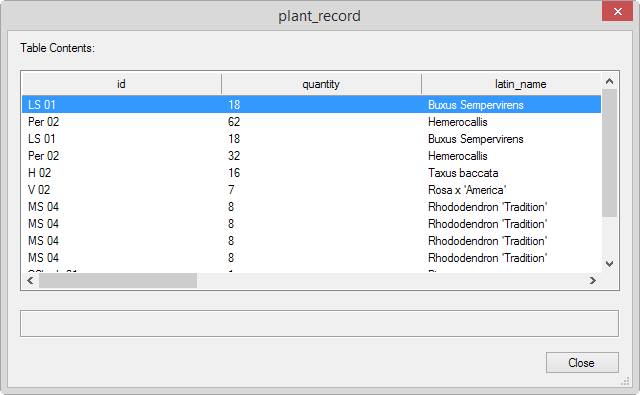
12. The objects with the record are connected to the rows of the database table. The table is filled with data from the record formats of the objects in the drawing.
~~~~~~~~~~~~~~~~~~~~~~~~~
 Specifying Update Settings
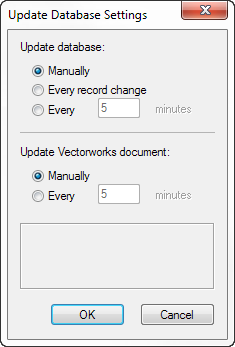
Database or Vectorworks file updates can be executed automatically or manually (Vectorworks Design Series required). The update settings control the frequency of automatic updates, or only permit manual updates.
If there are problems connecting to the database, an error message provides troubleshooting information. Click Details to open a log file in the default text editor application. The log file provides further information to help diagnose connection errors.
To specify update settings:
1. Select Tools > Database > Update Settings.
The Update Database Settings dialog box opens. Specify the update parameters.
Click to show/hide the parameters.
2. Click OK.
If the record fields have been changed for objects with linked fields to a database table, and the link type for the field is set to Read/Write or Write Only, the drawing data can update the database table data.
Select Tools > Database > Update External Database.
If database information has changed, and the link type for connected record fields is Read/Write or Read Only, the information can be automatically sent to the Vectorworks file, updating the record fields of all object instances connected to the database.
Select Tools > Database > Update Vectorworks Document.
~~~~~~~~~~~~~~~~~~~~~~~~~
 ODBC
Driver Information
ODBC
Driver InformationWhen setting up a database program for ODBC functionality (Vectorworks Design Series required), related drivers may not be installed. This list describes drivers available for each platform, where to obtain them, and current problems that may exist.
SQLite database files do not require an ODBC manager.
On Windows, the ODBC manager is integrated into the operating system (OS).
Driver Name |
Driver |
Driver Connection |
Update Vectorworks records by reading data from database |
Update database with Vectorworks record data |
Add new database table rows through object connection |
|---|---|---|---|---|---|
Microsoft Access |
Integrated* in the OS |
Supported, working |
Supported, working |
Supported, working |
Supported, working |
Microsoft Excel |
Integrated* in the OS |
Supported, working |
Supported, working |
Supported, working |
Supported, working |
Microsoft SQL Server |
If not integrated in the OS, ask vendor |
Supported, working |
Supported, working |
Supported, working |
Supported, working |
Microsoft Text Driver |
Integrated* in the OS |
Supported, working |
Supported, working |
Supported, working |
Supported, working |
MySQL |
Available at: |
Supported, working |
Supported, working |
Supported, working |
Supported, working |
FileMaker Pro ** |
Available at: |
Supported, working |
Supported, working |
Supported, working |
Supported, working |
* On Windows 7 64-bit systems, you need to run the 32-bit ODBC manager (odbcad32.exe) to see the built-in drivers, which are currently 32-bit only.
** FileMaker Pro includes the driver needed to share your database as a data source. To use your FileMaker database file locally, FileMaker Pro must be running, and the database file opened and shared. To share your FileMaker database file as a data source over a network, use FileMaker Server Advanced.
On the Mac, there is no integrated ODBC manager. Suggestions include:
• ODBC Manager (http://www.odbcmanager.net)
• iODBC Manager (http://www.iodbc.org)
• ODBC Administrator Tool (http://support.apple.com/downloads/ODBC_Administrator_Tool_for_Mac_OS_X)
Driver Name |
Driver |
Driver Connection |
Update Vectorworks records by reading data from database |
Update database with Vectorworks record data |
Add new database table rows through object connection |
|---|---|---|---|---|---|
Actual SQL |
Available at: |
Supported, working |
Supported, working |
Supported, working Problem reported: data length restriction when writing to database |
Supported, working Problem reported: data length restriction when writing to database |
Actual Access |
Available at: |
Supported, working |
Not supported |
Not supported |
Not supported |
MySQL |
Available at: |
Supported, working |
Supported, working |
Supported, working |
Supported, working |
FileMaker Pro * |
Available at: |
Supported, working |
Supported, working |
Supported, working |
Supported, working |
* FileMaker Pro includes the driver needed to share your database as a data source. To use your FileMaker database file locally, FileMaker Pro must be running, and the database file opened and shared. To share your FileMaker database file as a data source over a network, use FileMaker Server Advanced.
~~~~~~~~~~~~~~~~~~~~~~~~~