
Centenas de bibliotecas de recursos estão disponíveis para uso com o aplicativo Vectorworks, e você também pode adicionar bibliotecas personalizadas. Na paleta do Administrador de Recursos, o painel do navegador de arquivos (à esquerda) fornece acesso fácil às bibliotecas de recursos; para um acesso ainda mais rápido, designe as bibliotecas mais usadas como "favoritos".
The Resource Selector has a similar browser pane, to provide access to resource libraries at the point of use. For example, you can browse line type resources from the Attributes palette, and browse plant definitions (Vectorworks Landmark required) from the Plant tool’s Tool bar.

From both the Resource Manager and Resource Selector, you can drag a library resource to a file in the file browser pane to easily import it. From the Resource Manager, you can also drag a library resource directly onto your drawing.
If you are a Vectorworks Service Select subscriber, the subscription libraries provide exclusive access to additional content.
The Vectorworks libraries available depend on which Vectorworks products you have. New content is added on an annual basis at no additional cost. The files are organized by professional discipline and subject.
The Resource Manager and Resource Selector allow you to browse the content online, and they will automatically download the required files on demand. If you work mostly offline and would like to have the content locally available, you can add these libraries during installation, or download them any time with the Vectorworks Package Manager (see Installing Vectorworks Libraries Locally).
Periodically, new libraries are added to the catalog. If your library catalog is out of date, an alert displays when you start the Vectorworks program. Click Update or Download and Update to bring your libraries up to date.
Default content libraries are a subset of the Vectorworks libraries. Select Vectorworks Libraries from the file browser pane, and then open the Defaults folder. Product-specific default libraries are automatically installed with all Vectorworks products.
Default content libraries are available in the Resource Manager and Resource Selector, and in various locations in the Vectorworks application, such as the Text Style list on the Tool bar for the Text tool. If you do not want default Vectorworks content to display in these locations, disable the Enable Vectorworks Libraries and/or the Enable online content preference on the Session tab of the Vectorworks preferences. See Vectorworks Preferences: Session Tab.
You can create your own custom resource libraries (user libraries), and if Vectorworks Design Series products are installed, you can share custom libraries with a workgroup.
• To access your custom files from the Resource Manager or Resource Selector, place the files in folders in your user folder or in a workgroup folder. See Criando Bibliotecas de Recursos Personalizados.
• To access your custom resources as default content in the Vectorworks application interface, place the library files in the appropriate Libraries\Defaults folder in your user folder or in a workgroup folder. See Creating Custom Default Content.
You must right-click on the User or Workgroup library heading and select Refresh (or select Refresh Libraries in the File options menu) after editing or adding files to the library to gain access to the new resources/files.
~~~~~~~~~~~~~~~~~~~~~~~~~
O Administrador de Recursos e Seletor de Recursos permitem que você navegue as bibliotecas do Vectorworks on-line, o download do arquivo selecionado é feito automaticamente. Instale as bibliotecas somente se você trabalha a maior parte do tempo off-line e gostaria de ter o conteúdo disponível localmente.
Você pode baixar e instalar as bibliotecas de conteúdo do Vectorworks através da Internet. Se você não puder baixar grandes volumes de dados, pode instalar os recursos a partir de arquivos .vpkg locais enviados para você em uma unidade USB. As bibliotecas disponíveis dependem de quais produtos Vectorworks são licenciados. Elas são instaladas na pasta do aplicativo Vectorworks [Vectorworks] \ Libraries.
Os membros do Vectorworks Service Select têm acesso exclusivo ao conteúdo adicional que está disponível sob demanda a partir do Administrador de Recursos e Seletor de Recursos.
Para instalar bibliotecas do produto através da internet:
1 Selecione Help> Baixar Conteúdo
A caixa de diálogo do Vectorworks Package Manager abrirá. Os pacotes de bibliotecas disponíveis para os produtos Vectorworks licenciados são listados. Se todos os recursos em um pacote específico já foram instalados em seu sistema, o Vectorworks Package Manager indicará o Status: Installed (Instalado).
2 Se houver conteúdo disponível ainda não instalado em seu sistema, clique em Install sob o respectivo pacote para baixar os arquivos da biblioteca. Clique em Install All (Instalar Tudo) na parte superior da caixa de diálogo para todas as categorias de produtos, ou em uma categoria de produto específico, para instalar todo o conteúdo disponível que ainda não foi instalado.
Uma barra de progresso é exibida durante a instalação e indica se a operação foi concluída com sucesso ou se falhou. Se a operação falhou, é fornecida uma explicação, quando possível.
As bibliotecas de conteúdo são grandes e levam um tempo considerável para serem baixadas. Em vez de baixar individualmente em várias máquinas, você pode baixar os pacotes todos de uma vez e, em seguida, copiar os arquivos da pasta [Vectorworks] /Libraries para cada computador que tem o software instalado.
Se arquivos de biblioteca forem adicionados ou alterados após a instalação, o indicador Status: Installed sob o pacote em que o arquivo foi adicionado ou alterado mudará para Install. Você pode simplesmente clicar em Install para reinstalar o pacote incluindo o novo conteúdo, ou pode checar as alterações antes de decidir como proceder.
Para checar as alterações de conteúdo antes de reinstalar:
1 Clique-direito (Windows) ou Ctrl + clique (Mac) sobre o nome do pacote e selecione Info.
Uma caixa de diálogo de Informações do Pacote abrirá.
2 Clique em Compare para gerar uma comparação automática dos arquivos de biblioteca disponíveis online com os instalados no sistema. Arquivos novos e alterados serão destacados.
3 Se você quiser reinstalar todos os arquivos de biblioteca do pacote, incluindo os arquivos novos ou alterados, clique em Reinstall (Reinstalar)
Para copiar a lista de nomes e caminhos de arquivos de biblioteca para a área de transferência, para análise em outro formato ou para compartilhar, clique em Copy (Copiar)
4 Clique em Done (Concluído)
Para instalar as bibliotecas de recursos a partir de um DVD ou USB drive local adquirido com seu Vectorworks:
1 Insira o DVD ou drive USB em seu computador.
2 Selecione Help > Baixar Conteúdo.
A caixa de diálogo do Vectorworks Package Manager abrirá.
3 Clique em Direct Install> Install a Local Package (Instalação Direta > Instalar um Pacote Local)
A caixa de diálogo Abrir é mostrada.
4 Navegue para os arquivos .vpkg em seu drive local, selecione os arquivos a serem instalados e clique em Abrir.
Uma caixa de diálogo exibe o progresso da instalação e indica se a operação foi concluída com sucesso ou se falhou. Se a operação falhar, é fornecida uma explicação, quando possível.
~~~~~~~~~~~~~~~~~~~~~~~~~
Bibliotecas personalizadas são simplesmente arquivos do Vectorworks que contêm recursos específicos para tornar mais rápido e fácil acessar os recursos ao desenhar no programa Vectorworks. Bibliotecas não aumentam o tamanho do arquivo atual ou consomem quantidades significativas de memória.
Depois de criar um arquivo de biblioteca de recursos e colocá-lo no local apropriado, você deve dar um clique-direito no Usuário ou no título da biblioteca do Grupo de Trabalho e selecionar Atualizar (ou selecionar Atualizar Bibliotecas no menu de opções Arquivo) para tornar os novos recursos disponíveis no Administrador de Recursos e Seletor de Recursos.
Para criar um arquivo de biblioteca de recursos:
1 Selecionar Arquivo > Novo.
2 Importar ou criar os recursos a serem incluídos na biblioteca.
3 Selecionar Arquivo > Salvar.
A janela de diálogo Salvar Desenho Vectorworks abrirá.
4 Selecionar o local para salvar o arquivo.
Colocar o arquivo da biblioteca na localização apropriada (usuário ou grupo de trabalho, padrão ou não), dependendo de como você deseja acessá-lo. Se você tiver vários arquivos, crie várias pastas para organizá-los. O Administrador de Recursos também permite que você crie pastas internas para organizar os recursos dentro de um determinado arquivo.
Método de Acesso |
Localização do Arquivo |
Referência |
|---|---|---|
Grupo de Favoritos no Administrador de Recursos e Seletor de Recursos
|
• Opção 1: O arquivo pode estar em qualquer biblioteca. No Administrador de Recursos, clique-direito no arquivo e selecione Adicionar Arquivo Selecionado aos Favoritos no menu contextual. • Opção 2: pasta Favoritos na sua pasta de usuários: [User]\Libraries\Favorites\[folder name] |
|
Grupo de Bibliotecas do Usuários no Administrador de Recursos e Seletor de Recursos |
Pasta de bibliotecas em sua pasta de usuário: [User]\Libraries\[folder name] |
|
Grupo de Bibliotecas do Grupos de Trabalho no Administrador de Recursos e Seletor de Recursos |
Pastas de biblioteca em uma pasta de rede designada como sua pasta de grupo de trabalho (necessário Vectorworks Design Series): [Workgroup]\Libraries\[folder name] |
|
Em qualquer lugar que as listas de recursos de conteúdo padrão estão disponíveis, tais como a lista de Estilos de Texto na Barra de Ferramentas da ferramenta de Texto |
Pastas padrão na pasta de usuário ou em uma pasta de rede designada como sua pasta de grupo de trabalho: (requer Vectorworks Design Series): [User]\Libraries\Defaults\[standard folder name] [Workgroup]\Libraries\Defaults\[standard folder name] |
5 Digitar um nome para o arquivo no campo Nome.
6 Clicar em Salvar.

Recursos de Conteúdo Default estão disponíveis em vários locais no aplicativo Vectorworks, como por exemplo a lista de estilo de texto na Barra de Ferramentas para a ferramenta de Texto. Você pode personalizar o Conteúdo Default disponível criando bibliotecas de recursos e colocando-as em uma pasta Defaults na sua Pasta do Usuário, ou em uma Pasta de Grupo de Trabalho compartilhada.
Não modifique os arquivos na pasta Defaults da pasta Vectorworks Libraries, porque as alterações podem ser perdidas quando você atualizar o aplicativo Vectorworks.
A localização dos seus arquivos de conteúdo personalizado depende de quem precisa de acesso ao conteúdo. A estrutura de pastas deve ser a mesma que a do Conteúdo Default do Vectorworks, e se existe uma subpasta, o arquivo deve ser colocado na subpasta. Por exemplo, hachuras padrão do Vectorworks estão em um arquivo na Pasta do Aplicativo Vectorworks: [Vectorworks]\Libraries\Defaults\atributtes - Hatches. Para tornar sua biblioteca de hachuras personalizadas disponível no Vectorworks, coloque um arquivo que contém as hachuras desejadas na sua Pasta do Usuário ou em uma Pasta de Grupo de Trabalho.
• Para criar Conteúdo Default apenas para você, coloque o arquivo na subpasta apropriada dentro de [User]\Libraries\Defaults (onde [User] é a pasta de dados do usuário especificada nas Preferências do Vectorworks). Por exemplo, colocar um arquivo de hachuras em [User]\Libraries\Defaults\atributtes - Hatches. Consulte a Vectorworks Preferences: User Folders Tab para mais informações.
• Se os produtos Vectorworks Design Série estiverem instalados, você pode criar Conteúdo Default específico de um projeto, ou que é compartilhado com um Grupo de Trabalho. Para fazer isso, coloque o arquivo na rede, na subpasta apropriada dentro de [Workgroup]\Libraries\Defaults (onde [Workgroup] é uma pasta de Grupo de Trabalho especificada em suas Preferências do Vectorworks). Por exemplo, colocar um arquivo de hachuras em [Workgroup]\Libraries\Defaults\Atributtes - Hatches). Quando os colaboradores configurarem esta Pasta de Grupo de Trabalho em suas preferências, eles também têm acesso ao Conteúdo Default. Veja Sharing Custom Files with a Workgroup para mais informações.
O nome do arquivo personalizado de uma biblioteca também afeta a disponibilidade de recursos no Vectorworks. Por exemplo:
• Para substituir totalmente as hachuras padrão do Vectorworks, use o mesmo nome do arquivo de hachuras da Pasta do Aplicativo Vectorworks ( "_Default Hatches.vwx").
• Para tornar disponíveis como padrão as suas hachuras personalizadas, juntamente com as hachuras padrão Vectorworks, use um nome exclusivo, como "Custom_Hatches.vwx"
Se um nome de arquivo é repetido em qualquer uma das pastas, apenas o conteúdo de um arquivo é mostrado, de acordo com a seguinte ordem de precedência: Pasta de Usuário, Pasta de Grupo de Trabalho, Pasta do Aplicativo. Por exemplo, se existirem os seguintes arquivos:
• [User]\Libraries\Defaults\Attributes - Hatches\_Default Hatches.vwx
• [Workgroup]\Libraries\Defaults\Attributes - Hatches\_Default Hatches.vwx
• [Vectorworks]\Libraries\Defaults\Attributes - Hatches\_Default Hatches.vwx
Se um arquivo de biblioteca personalizada contém vários tipos de conteúdo, o programa só exibe o tipo de conteúdo da pasta que contém o arquivo personalizado (ou um atalho para o arquivo). Por exemplo, se um arquivo contém hachuras e texturas de paredes, e está localizado na pasta Libraries\Defaults\Walls_Slabs_Roofs - Textures, apenas as texturas de paredes serão exibidas como padrão no Vectorworks. as hachuras neste caso serão ignoradas
Use o Administrador de Recursos para criar, aplicar e gerenciar recursos no documento atual, e para acessar recursos em outros documentos (veja Conceito: Administrador de Recursos).
Selecione Janela> Paletas> Administrador de Recursos para abrir o Administrador de Recursos.

Recurso |
Descrição |
|---|---|
Barra de Ferramentas |
Contém vários controles para exibição de bibliotecas e recursos, um menu para trabalhar com arquivos de recursos e um campo de pesquisa para localizar recursos. |
Painel do navegador de arquivos |
Exibe arquivos e pastas dos quais você pode acessar recursos. Selecione um arquivo do grupo de Arquivos Abertos ou Favoritos ou navegue por grupos de Bibliotecas para localizar um arquivo que contém os recursos de que você precisa. Para procurar um arquivo que não é exibido, selecione Procurar um Documento no menu de Opções na Barra de Ferramentas. |
Painel de visualização de recursos |
Exibe recursos do arquivo selecionado. Selecione a forma de exibição e o tipo de recurso a ser exibido na barra de ferramentas. Vários comandos de menu de contexto estão disponíveis para trabalhar com recursos, conforme descrito no Resource Manager: Resource Preview Pane. |
Painel de Pré-visualização |
|
Painel de pré-visualização de recursos (Topo) |
Exibe uma visualização de alta resolução do recurso selecionado; para símbolos e objetos plug-in selecione a vista e o modo de apresentação a partir dos menus na parte inferior do painel |
Painel de dados (Inferior) |
Exibe tags e dados associados ao recurso selecionado, caso existam. |
Botões de Acesso Rápido |
Botões exibidos na parte inferior da paleta para criar rapidamente um recurso ou uma pasta no arquivo ativo ou no arquivo selecionado no painel do navegador de arquivos. Arquivos de uma biblioteca online ou de uma biblioteca do Vectorworks não podem ser editados. Veja Creating Resources e Creating Resource Folders. |
Dois botões na barra de ferramentas da paleta abrem e fecham o painel do navegador de arquivos (à esquerda) e o painel de pré-visualização (à direita). Quando um painel é fechado, o painel de visualização de recursos é redimensionado para preencher o espaço.

A paleta do Administrador de Recursos é redimensionável e você também pode arrastar as barras de divisão entre os painéis para redimensiona-los. Ao redimensionar a paleta até o ponto onde ela não pode mais exibir todos os botões da barra de ferramentas, pequenos botões aparecerão na borda direita da paleta. Clique em um botão para acessar as funções ocultas.

O layout e a posição de todas as paletas são salvas automaticamente quando você sai do programa Vectorworks.
Para salvar o layout do Administrador de Recursos para reuso em outras sessões do Vectorworks, selecione Janela> Paletas> Salvar Posições das Paletas. Isso cria um workspace personalizado na sua pasta do usuário. Para reverter essas configurações salvas a qualquer momento clique em Zerar Ajustes Salvos na aba Sessão das Preferências do Vectorworks.
~~~~~~~~~~~~~~~~~~~~~~~~~
The file browser pane lists open files, favorite files, and various library files from which you can access resources. The Open Files group always displays. Use the buttons on the palette tool bar to show or hide the other file groups.
Group |
Description |
|---|---|
Open Files |
Lists all currently open files |
Favorites |
Lists all files that you have designated as favorites from the Resource Manager |
Subscription Libraries |
Lists online content exclusively available to Vectorworks Service Select subscribers |
Vectorworks Libraries |
Lists libraries installed or available for download with the Vectorworks program |
User Libraries |
Lists libraries you place in your User Data and Preferences folder; see Vectorworks Preferences: User Folders Tab |
Workgroup Libraries (Design Series required) |
Lists libraries placed in your Workgroup and Project folders; see Sharing Custom Files with a Workgroup |
To quickly expand or collapse a group, click the disclosure arrow next to the group name, or double-click the group heading. To expand or collapse all groups, press the Alt key (Windows) or Option key (Mac) while you click one of the group headings.
Drag the group headings up or down to change the order of the groups. The files in each group are always listed in alphabetical order.
The file options menu on the palette tool bar and the context menus in the file browser pane provide commands to work with resource files. Most of the commands are used to create and maintain a list of links to your “favorite” files, which contain resources that you use frequently. Some commands are available from both menus.

Right-click on the desired file or resource folder within a file to open the context menu. The commands available are determined by the type of file or folder selected; for example, Remove from Favorites is only available for files in the Favorites group.
► Click to show/hide the commands.
To create a favorite manually (not through the Resource Manager):
1 Place the file that you want to display on the Favorites list (or a shortcut or alias that points to the file) in one of the following folders.
Favorites Folder |
Effect on Favorites Lists |
|---|---|
[User]\Libraries\Favorites |
The file displays only in your Favorites group ([User] is the user data folder specified in your Vectorworks preferences); see Vectorworks Preferences: User Folders Tab |
[Workgroup]\Libraries\Favorites (Design Series required) |
The file displays in the Favorites group of any user who has the workgroup folder set up in Vectorworks preferences; see Sharing Custom Files with a Workgroup |
2 From the Resource Manager, right-click on the Favorites library heading and select Refresh.
Only files that are in your user Favorites folder can be removed with the commands in the Resource Manager. Files that were placed in a workgroup Favorites folder must be removed manually.
~~~~~~~~~~~~~~~~~~~~~~~~~
The resource viewer pane displays resources in the file selected in the file browser pane. Select a specific type of resource from the tool bar to filter the display, or select the option to show all resources. Folders always display at the top of the pane. To change the sort order, right-click and select Sort By from the context menu. You can always sort by name, in ascending or descending order; when all resources are displayed, you can also sort the resources by type.
Three buttons on the palette tool bar control the display of resources in the resource viewer pane.

All views show the name of the resource and a preview image or representational icon for each resource. Symbol definitions display in the color associated with their type (see Concept: Vectorworks Symbols). Page-based hatches, tiles, and line types also display in green.

To change the view, click a view button on the palette tool bar. Alternatively, right-click anywhere in the resource viewer pane, and select View As from the context menu.
The context menus in the resource viewer pane provide commands to work with the folders and resources that display in the pane. Right-click on the desired folder or resource; the context menu lists commands that apply to that item.
Available commands are determined by the type of resource selected, as well as what file the resource is in. For example, commands that modify the resource (such as Edit and Rename) are only available in the active file.
► Click to show/hide the commands.
~~~~~~~~~~~~~~~~~~~~~~~~~
The top panel of the pane displays a high-resolution preview of the selected resource. For symbols and plug-in objects in an open file, you can adjust the standard view for the object and render mode (Wireframe, OpenGL, or Hidden Line).
The bottom panel displays any tags and data attached to the resource.

~~~~~~~~~~~~~~~~~~~~~~~~~
There are various methods to create new resources in a drawing. Most new resources are created through the Resource Manager, as described here. Some types of resources, such as scripts and text styles, can also be created from menu commands elsewhere in the Vectorworks program. Many plug-in objects, such as columns and hardscapes, can be saved as resources from the Object Info palette. Symbols can only be created with the Modify > Create Symbol command.
To create a resource:
1 From the Resource Manager’s file browser pane, select the file in which to create the resource. Resources cannot be created in online files or in Vectorworks library files.
2 Do one of the following:
• Select the resource type to create from the list on the tool bar, and then click the New [resource type] button. If the file you selected is not the active file, you are given the option to create the resource in the active file instead.
• Select the resource type to create from the list on the tool bar. Right-click in the resource viewer pane, and select either New [resource type] in [selected file] or New [resource type] in Active Document from the context menu.
• Click the New Resource button, or double-click in an open area of the resource viewer pane. If the file you selected is not the active file, you are given the option to create the resource in the active file instead. When the Create Resource dialog box opens, select a resource type and click Create.
3 The creation dialog box for the resource type you selected opens. Access the online help system from that dialog box for details about setting up each type of resource.
~~~~~~~~~~~~~~~~~~~~~~~~~
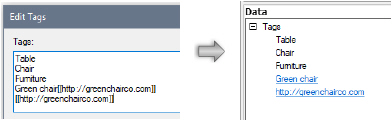
Tags are words used to help locate relevant resources with the search function; see Searching for a Resource. When a resource with tags is selected in the Resource Manager, the tags display in the Data panel of the Preview pane.
To add or edit a resource tag:
1 From the Resource Manager, select the resource or resource folder to edit, and then right-click and select Add a Tag or Edit Tags from the context menu.
The Add a Tag or Edit Tags dialog box opens.
2 Enter each tag as it should appear; a tag can be more than one word (such as “office furniture”). Press Enter (Windows) or Return (Mac) to separate each tag.
3 To optionally include a hyperlink as a tag, do one of the following:
• To display regular text that serves as a hyperlink, enter the display text followed by the URL inside double brackets: Green chair[[http://greenchairco.com]]
• To display the URL as a hyperlink, enter the URL inside double brackets: [[http://greenchairco.com]]
Use folders to organize the resources within a file. Each folder is designated for a specific resource type. For example, only gradient resources can be copied to a gradient folder. You can have multiple folders of the same type. When you have a single resource type selected for display, only folders for that resource type display.
To create a resource folder:
1 From the Resource Manager’s file browser pane, select the file in which to create the folder.
2 Click the New Folder button. The New Folder dialog box opens.
Alternatively, if a specific resource type is selected in the Palette tool bar, right-click in the resource viewer pane, and select New Folder in Active Document or New Folder in [selected file].
3 If the All Resources option is selected as the resource type in the palette tool bar, select a Folder Type for the new folder. Otherwise, the folder is automatically associated with the active resource type.
4 Enter a Folder Name, and click OK.
Once created, the resource folder displays in both the file browser and resource viewer panes.
5 Drag and drop resources to add them to the folder.
• Dragging a resource from another file places a copy in the folder.
• Dragging a resource from one location to another in the same file moves the resource. To move a copy instead, press the Ctrl key (Windows) or Option key (Mac) while dragging the resource.
~~~~~~~~~~~~~~~~~~~~~~~~~
When a resource or resource folder (with its contents) is deleted, all instances of the resource in the active file can be deleted completely or replaced with a different resource of the same type.
To delete a resource/resource folder:
1 From the Resource Manager’s file browser pane, select the active file.
2 Right-click on the resource/resource folder to delete, and select Delete from the context menu.
Alternatively, select the resource/folder and press the Delete key.
3 If there are any instances of a deleted resource currently in the drawing, the Delete [resource] dialog box opens. Otherwise an alert displays to confirm the deletion.
► Click to show/hide the parameters.
4 Click Yes.
The resource/folder is deleted and each resource instance is either deleted or replaced with the selected resource.
You can select multiple resources to delete at the same time. However, the option to replace instances of the deleted resource with a different resource is available only if all the resources selected for deletion are of the same type, such as all gradients or all record formats.
~~~~~~~~~~~~~~~~~~~~~~~~~
Resource files saved in a previous version of Vectorworks do not automatically appear in your list of resources, but you can browse to access the contents of the file without opening it, and can then optionally save the file to the current version of Vectorworks.
To access resources in a previous version of Vectorworks:
1 In the Resource Manager, under File options, select Browse a Document.
A file browser opens.
2 Browse to the desired file, and click Open.
The browsed file displays at the bottom of the list in the file browser pane.
3 Click the file to access the resources in the file without opening it. These resources can be copied into current files.
4 If you need to save the browsed file into the current Vectorworks version, right-click on the file in the file browser pane and click Save.
5 The Save Vectorworks Drawing dialog box opens.
6 Name and save the file, which is listed as a browsed file at the bottom of the file browser pane. You can then continue to access the resources from the browsed file or right-click on the file to access its context menu for additional operations.
~~~~~~~~~~~~~~~~~~~~~~~~~
Use the Resource Manager to apply resources to your drawing. If the resource is not in the active file, import or reference the file, and then apply it.
In addition to the Resource Manager, there are many places in the Vectorworks program where you can select resources from a dialog box, palette, or the Tool bar; see Seletor de Recursos.
To use a resource:
1 From the Resource Manager, use the file browser pane to select the file that contains the resource.
2 The resource viewer pane displays the resources available in the selected file. From the palette tool bar, select a type of resource to filter the display, or select the option to display all resources.
3 Do one of the following:
• Double-click the resource to apply or activate it.
• Drag the resource onto an object or to a location in the active file.
• Right-click on the desired resource, and select the highlighted item from the context menu. (For example, for a hatch, select Apply; for a worksheet, select Worksheet on Drawing.)
• To import the resource for future use, right-click on the desired resource, and select Import from the context menu.
• To reference the resource, right-click on the desired resource, and select Reference from the context menu. If the source file is not currently referenced by this file, specify the new reference information. See Referencing Resources.
4 If you are importing the resource from another file, you are prompted to specify the location to store the imported resource. See Importing Resources.
The resource is added to the active file.
~~~~~~~~~~~~~~~~~~~~~~~~~
The Resource Manager has a search box to help you quickly locate a resource using keywords.
To locate and use a resource:
1 From the Resource Manager tool bar, click the disclosure arrow to the left of the search box and select your search options.
► Click to show/hide the options.
2 Enter a search string and optionally one or more basic Boolean search operators in the search box and press Enter to execute the search. The search locates the string in resource names, tags, and (if Include Records is selected in the search options) records attached to resources.
Vectorworks recognizes Boolean search operators “” (quotation marks), * (search for strings that begin with the characters indicated), AND, NOT, and OR. Boolean operators can be combined, such as combining two strings inside quotation marks with the word OR, to created precise searches.
The search operators AND, NOT, and OR are case sensitive; they must be entered in all capital letters to function correctly.
The search box retains and displays the last 10 searches; to clear this list, scroll to the bottom of the list and click Clear Recent Searches.
Search Example |
Possible Results |
|---|---|
green chair (no quotation marks) |
Results with the search terms green and chair anywhere in the resource name, tags, and optionally record are returned • green chair • chair with green stripes • green hatch with the word chair in the tag |
“green chair” (quotation marks) |
Results with the exact string inside the quotations marks, the word green immediately followed by the word chair, are returned • green chair |
green c* |
Results with the search term green and any term that begins with the letter c are returned • green chair • chair with green stripes • green couch • car with green in the tag |
“green c”* |
Results with the word green immediately followed by a word that beings with the letter c are returned • green chair • green couch • green car |
“green c*” |
Results with the exact string inside the quotations marks, the word green immediately followed by the letter c and * (an asterisk), are returned; inside the quotation marks, an asterisk not does behave as a Boolean operator but merely as an asterisk • green c* |
green AND chair |
AND searches are the default, so the command is not necessary for basic searches; this search returns the same results as searching for green chair. • green chair • chair with green stripes • green hatch with the word chair in the tag However, AND can be used with other operators to craft a specific search. |
“green chair” AND table |
Results with the exact string inside the quotations marks, the word green immediately followed by the word chair, AND the word table are returned • green chair with table in the tag • combination symbol named “green chair and side table” |
green NOT chair |
Results that contain the first term but do not contain the excluded term are returned • green couch • green car |
green OR chair |
Results with at least one of the search terms are returned • green chair • green couch • red chair |
3 Resources that match the search display in the resource viewer pane. Standard context menu commands are available for the resources, or you can drag the resource to another file if desired. Two additional features are available for search results:
• Hold the cursor over a resource to display a tooltip that shows the resource’s name and location.
• Right-click on a resource, and select Select Resource Location from the context menu to select the file that contains the resource in the file browser pane.
Use the Locate in Resource Manager command to quickly locate resources displayed in the drawing area. This command does not work for record formats or scripts.
To locate a resource from the drawing:
1 Right-click on the resource (or object containing a resource, such as a rectangle with a hatch) to be located. Select Locate [resource type] in Resource Manager from the context menu.
2 The Resource Manager automatically navigates to the resource and selects it.
~~~~~~~~~~~~~~~~~~~~~~~~~
Use the import function of the Resource Manager to import one or more resources or resource folders from any file to the active file, without opening the source file.
To import resources or resource folders:
1 From the Resource Manager’s file browser pane, select any file other than the active file.
2 Select one or more resources or resource folders to import.
3 Right-click on the resource/folder, and select Import from the context menu.
The Import Resource(s) dialog box opens.
► Click to show/hide the parameters.
4 Click OK.
5 If the active file already contains a different resource with the same name, you are prompted to resolve the Resource Name Conflict.
A fast way to import is to simply drag and drop one or more resources from any file or folder to the active file in your Open Files list.
~~~~~~~~~~~~~~~~~~~~~~~~~
 Exporting
Resources
Exporting
ResourcesIf you create custom resources and reuse them frequently, you may want to organize them into resource libraries. You and other users can add the libraries to your Favorites, User Libraries, or Workgroup Libraries, and then easily use resources from them. See Conceito: Administrador de Recursos.
In the Vectorworks Design Series products, use the export function of the Resource Manager to export one or more resources or resource folders from the active file to another file, without opening the target file.
To export resources or resource folders:
1 From the Resource Manager, select the active file from the Open Files list.
2 Select one or more resources or resource folders to export.
3 Right-click on the resource/folder, and select Export from the context menu.
The Export Resource dialog box opens.
► Click to show/hide the parameters.
4 Click OK.
5 If the target file already contains a different resource with the same name, you are prompted to resolve the Resource Name Conflict.
A fast way to export is to simply drag and drop one or more resources from any file to any file or folder in your Open Files, Favorites, User Libraries, or Workgroup Libraries. If you drag a resource to one of the Subscription Libraries or Vectorworks Libraries, an alert displays.
When you import or export resources or resource folders between files, there may be a name conflict with a resource/folder that already exists in the target file. The conflict must be resolved before the operation can continue. Conflicts can happen when you select the Import or Export command from the Resource Manager, or when you copy and paste an object that has an associated resource.
If a conflict occurs, the Resource Name Conflict dialog box opens automatically.
• If the resources are of different types (a hatch and a tile, for example), rename the new resource, or cancel the operation.
• If the resources are of the same type, select one of the following options and click OK.
• Replace the existing resource.
• (Record formats only) Merge the formats. Any incoming record field name that is not in the existing format will be added. If an incoming record field’s name and type match an existing field, the new data is transferred into the existing field. If an incoming record field’s type does not match the existing field, the data is converted to match the existing field, if possible. If the data cannot be converted, the existing value remains unchanged.
• Rename the new resource.
• Use the existing resource (do not import the new resource).
O Seletor de Recursos é exibido automaticamente para permitir que você selecione um recurso na barra de ferramentas, nas paletas de Atributos ou Informações de Objeto e em determinadas janelas de diálogo. O Seletor de Recursos é semelhante ao Administrador de Recursos, porém não existem funções de gerenciamento de recursos.

Recurso |
Descrição |
|---|---|
Barra de ferramentas da paleta |
Contém vários controles para exibição de bibliotecas e recursos, um menu para trabalhar com arquivos de recursos e uma caixa de pesquisa para localizar recursos |
Painel de Pesquisa de Arquivos |
Exibe arquivos e pastas dos quais você pode acessar recursos. Somente as pastas que você pode usar para a tarefa atual são exibidas. Por exemplo, se o Seletor de Recursos for exibido enquanto estiver selecionando uma hachura da paleta de Atributos, somente as pastas de hachura serão exibidas. Selecione um arquivo dos grupos Arquivos Abertos ou Favoritos ou procure em um dos grupos de Bibliotecas para localizar um arquivo que contém os recursos de que você precisa. Para procurar um arquivo que não é exibido, selecione Procurar um Documento no menu de opções do arquivo. |
Painel de visualização de recursos |
Exibe recursos do arquivo selecionado. Selecione um recurso e clique no botão Selecionar ou clique duplo em um recurso para aplicá-lo. Selecione o modo de visualização do recurso na barra de ferramentas da paleta. Ao contrário do Administrador de Recursos, nenhuma pasta é exibida no painel de visualização de recursos; Todos os recursos existentes no arquivo selecionado serão exibidos, a menos que você selecione uma pasta no painel do navegador de arquivos. |
Painel de pré-visualização |
|
Painel de pré visualização de recursos (topo) |
Exibe uma pré-visualização em alta resolução do recurso selecionado. Para símbolos e objetos de plug-in em um arquivo aberto, você pode ajustar a exibição padrão para o objeto e o modo de renderização (Aramado, OpenGL ou Linha Escondidas). |
Painel de Dados (inferior) |
Exibe tags e dados associados (se houverem) ao recurso selecionado |
Botões de Acesso Rápido |
Clique em Selecionar para aplicar o recurso selecionado ao arquivo ativo. Clique em Localizar no Administrador de Recursos para mostrar o recurso selecionado. |