Tool
Tool set
Callout

Basic
All Vectorworks products contain the Callout tool for annotating items in the drawing. The Vectorworks Design Series products provide an additional full set of features for creating and managing complete and fully-referenced annotation of project files. These features can streamline the annotation process by providing a central location for saving, selecting, and placing frequently-repeated notes. Notes can be reused across files, either within a project, or across separate projects. Notes can be placed as callouts, keynotes, or general notes.
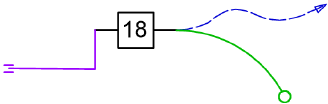
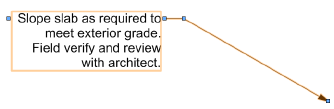
• A callout is text with one or more leader lines, that displays information about an item in the drawing. A callout object is included with the Vectorworks Fundamentals product. Its capabilities are extended in the Vectorworks Design Series products, allowing it to be used for keynotes in addition to ordinary notes.
• A keynote is a callout represented by a number or a letter, with a corresponding keynote legend containing the full text. The keynote legend automatically numbers the notes and ensures that multiple instances of the same note are assigned the same keynote number. Keynotes are commonly used in commercial construction, where drawings, and especially details, have many notes. For residential projects, keynotes might only be used for the detail pages; other pages might use full callouts.
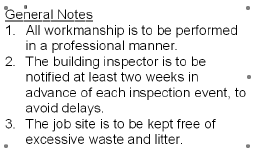
• General notes, also available in the Vectorworks Design Series products, contain numbered notes that are not associated with a particular item in the drawing.
The callout, keynote legend, and general notes objects can be used with manually-entered text, or in conjunction with external database files that save and retrieve text. When a database is used, text is entered only once into the database, and then pulled from the database for the notes in the drawing. This eliminates the need to type the same note repeatedly and also ensures consistency. The database can be copied or imported into the next project, so that most of a new project's notes are already typed and ready to go.
After notes have been placed, if changes are made to the database or to the notes, the differences can be reconciled with the Reconcile Notes command.
~~~~~~~~~~~~~~~~~~~~~~~~~
Tool |
Tool set |
|---|---|
Callout
|
Basic |
The Callout tool places callout objects to annotate items in a drawing. A callout object is a block of text attached to one or more leader lines with an optional bubble surrounding the text.
In the Vectorworks Design Series products, the Callout tool includes extended capabilities which allow it to be used for keynotes. If you use keynotes, a keynote legend is automatically created.
A keynote can be used without a database as described in this section, or in conjunction with an external notes database (see Placing Database Callouts).

Mode |
Description |
|---|---|
Towards Target |
Click first where the callout text is to be placed, and place the final click on the object to be annotated |
Towards Text |
Click first on the object to be annotated, and place the final click where the callout text is to be placed |
Two Point |
The length of the shoulder is determined in the callout preferences or in the Object Info palette |
Three Point |
The length of the shoulder is determined by clicking in the drawing area; this requires an additional click. For example, if Max Leader Line Points is set to 2, three clicks are required to place the object with a custom shoulder length, and if Max Leader Line Points is set to 5, six clicks are required. |
Max Leader Line Points |
Enter the maximum number of leader line points for this callout object. If the object has multiple leader lines, each line can have a different number of points. Double-click to end a leader line that has fewer than the maximum allowed number of points. |
Preferences |
Opens the Callout Preferences dialog box |
To create a callout or (for Vectorworks Design Series products) a keynote:
1 Click the tool and then click Preferences.
2 The Callout Preferences dialog box opens. Specify the default settings for callouts or keynote objects during this session. You can edit these settings later from the Object Info palette, and make additional edits as described in Editing the Callout.
► Clique para exibir/ocultar parâmetros.
3 Click OK to set the callout or keynote preferences.
4 Click the applicable insertion modes, and then click in the drawing to set the insertion point of the callout or keynote object.
Depending on the mode, the first click defines the leader shoulder or the leader endpoint.

5 Continue clicking to set vertices and shape the leader line, as many times as permitted by the Max Leader Line Points value; double-click on the final point if this leader line requires fewer than the maximum number of points. The final click sets either the leader endpoint or leader shoulder, depending on the mode.
In Three Point mode, you can custom set the shoulder length by clicking in the drawing area; this requires one additional click.

The Notes Manager: Callout dialog box opens. Enter the callout or keynote legend text; text wraps if longer than the specified maximum text width. Press Enter to add a line in the text.
The callout or keynote is placed in the drawing; if a keynote is placed, a keynote legend object is also created.

6 To add leader lines, and to set the attributes for the various parts of the callout object, use the Object Info palette, as described in Editing a Callout Object.
|
Click here for a video tip about this topic (internet access required). |
~~~~~~~~~~~~~~~~~~~~~~~~~
Tool |
Tool set |
|---|---|
Callout
|
Basic |
To add one or more leader lines to a callout or keynote object:
1 Click the tool and set the Max Leader Line Points on the Tool bar.
2 Right-click on the object and select Add Leader Line from the context menu. Alternatively, select the object and click the Add Leader button from the Object Info palette.
3 Click to place the vertices of the new leader line; double-click on the final point if this leader line requires fewer than the maximum number of points.
4 Continue adding new leader lines as needed.
5 Press the Esc key to exit Add Leader Line mode.
6 Leader lines on the same callout can have different numbers of points, leader types, and pen attributes. Edit the leader lines from the Object Info palette as described in Editing the Callout.
To delete one or more leader lines from a callout or keynote object:
1 Right-click on the object and select Delete Leader Line from the context menu. Alternatively, select the object and click the Delete Leader button from the Object Info palette.
2 Click on the leader line to delete. Continue clicking to delete additional lines as needed.
3 Press the Esc key to exit Delete Leader Line mode.
Once the callout has been created, use the Object Info palette to edit the object. You can select multiple callout objects and make the same changes to all of them at once.
Most of the parameters are the same as the preferences set when Inserting Callouts or Keynotes. The following items are only available from the Object Info palette.
► Click to show/hide the editing options.
The following editing options are also available.
• Set the text font, size, and style using the Text > Format Text command. Alternatively, assign a text style to the callout.
• If there are several callout objects, use the Align/Distribute Leader Lines command to improve readability (see Alinhando e Distribuindo Linhas de Indicação).
• On the drawing, a callout object contains control points that can be moved with the mouse to change the shoulder and leader length and position. A curved callout leader includes additional control points for adjusting the leader curvature.

~~~~~~~~~~~~~~~~~~~~~~~~~
To specify bubble shadow edge and fill attributes:
In the Callout Preferences dialog box, click Shadow Settings, or in the Object Info palette for a selected callout or keynote legend, click Bubble Shadow Settings.
To activate this option, Bubble Style must be set to a style other than None, Bracket, ISO, or Vertical Accent Bar, and Bubble Shadow must be selected.
The Bubble Shadow Settings dialog box opens; set the parameters.
► Clique para exibir/ocultar parâmetros.
~~~~~~~~~~~~~~~~~~~~~~~~~
 Editing
Keynotes and the Keynote Legend
Editing
Keynotes and the Keynote LegendBoth the keynotes and keynote legend can be edited after placement. To edit a single keynote, select it and make the changes from the Object Info palette. To edit several keynotes, select the keynote legend and make the edits from the Object Info palette.
The keynotes bubble style can also display in the keynote legend; control the style with either the keynotes or the legend.
• Edit the text or graphics of an individual keynote the same as a callout; see Editing a Callout Object.
• To convert an existing keynote into an ordinary callout object, deselect Place As Keynote from the Object Info palette. The keynote is removed from the keynote legend.
If you delete a keynote, the remaining keynotes are not renumbered. The keynote legend maintains a “gap” or placeholder displaying the custom text specified in Unused Position Text. However, if Re-use Unused Positions is selected and another keynote is placed in the drawing, the new keynote replaces the first “gap” keynote. Clicking Remove Gaps from the Object Info palette of a selected keynote legend also removes gaps; another way to remove gaps is to sort the keynotes in the Notes Manager: Keynotes List dialog box.
Edit the keynote legend parameters from the Object Info palette.
► Clique para exibir/ocultar parâmetros.
For information on formatting text, see Formatando Textos. Text styles cannot be applied to keynote legends.
The keynote legend contains control points for adjusting the hanging indent and text width directly from the drawing.

To change the text or numbering of all keynotes at the same time:
1 Select the keynote legend and click Edit Notes from the Object Info palette.
The Notes Manager: Keynote List dialog box opens.
If the database controls are showing, click Hide Database Controls.
► Clique para exibir/ocultar parâmetros.
2 Each keynote is listed by a description, which normally consists of the first 42 characters of the keynote. To change a description, select it and click Edit. From the Edit Note dialog box, deselect Use the first 42 characters, and then edit the Description. You can also edit the note text. Click OK to close the Edit Note dialog box.
~~~~~~~~~~~~~~~~~~~~~~~~~
 Placing General Notes
Tool |
Tool set |
|---|---|
General Notes
|
Dims/Notes |
Notes management includes a General Notes tool, for placing and numbering general notes. A general note can be used without a database as described in this section, or in conjunction with an external notes database (see Placing Database General Notes).
To place a general notes object:
1 Click the tool and then click Preferences.
The General Notes Tool Settings dialog box opens. Specify the default settings for placing General Notes during this session.
► Clique para exibir/ocultar parâmetros.
2 Click to place the general notes object in the drawing.
The Notes Manager: General Notes dialog box opens.
► Clique para exibir/ocultar parâmetros.
3 To add a new general note, click Add.
The Add Note dialog box opens.
4 Enter the note text. Each note is listed by a description, which normally consists of the first 42 characters of the note. To change the description, deselect Use the first 42 characters, and then edit the Description.
5 Click OK to close the Add Note dialog box and add the note.
6 Create additional notes as needed, and then click OK to place the general notes object.
~~~~~~~~~~~~~~~~~~~~~~~~~
 Editing
General Notes
Editing
General NotesTo edit the text of an existing general notes object:
Either double-click the general notes object with the Selection tool, or select the object and click Edit Notes from the Object Info palette. The Notes Manager: General Notes dialog box opens.
• To edit a note, select the note description and click Edit. The Edit Note dialog box opens. Enter the text changes.
• To delete a note, select the note description and click Remove. Click Remove All to delete all notes.
• To change the order of a note, select the note description and click Move Up or Move Down.
Edit the general note parameters from the Object Info palette.
► Clique para exibir/ocultar parâmetros.
For information on formatting text, see Formatando Textos and Usando Estilos de Texto.
The general notes object contains control points for adjusting the hanging indent and text width directly from the drawing.

~~~~~~~~~~~~~~~~~~~~~~~~~
 Notes
Management with Databases
Notes
Management with DatabasesInstead of manually typing the text for every callout or keynote and general notes object, text that is used repeatedly—by one or many users—across projects and files can be stored in a tab-delimited text file (referred to as a “database”). The use of a database for storing notes saves time and prevents errors, and standardizes compliant notes usage across files.
There is no limit to the number of databases that can be used for annotating a drawing. The databases can have an unlimited number of notes of any length. After placement, notes can be easily updated if changes are made to a database.
~~~~~~~~~~~~~~~~~~~~~~~~~
 Placing Database Callouts
Tool |
Tool set |
|---|---|
Callout
|
Basic |
Callouts with database notes are placed with the extended capabilities of the Callout tool.
To place a database callout:
1 Click the tool and then click Preferences.
The Callout Preferences dialog box opens. For more information on the Callout tool, see Inserting Callouts or Keynotes.
2 Select Get Text from Database; the current database file is displayed as a button.
3 To select a different database, click the database button.
The standard Open dialog box allows a different database file to be selected. Select the database file, and click Open.
A sample database is located in the Vectorworks application folder: [Vectorworks]\Libraries\Defaults\Notes\Callouts.txt
4 Click OK.
5 Click in the drawing to place the callout object.
Once the callout leader is drawn, the Notes Manager: Callout dialog box opens automatically, displaying the information from the selected database.
The notes in a selected section are listed by a description.
► Clique para exibir/ocultar parâmetros.
6 To add a note to a selected section, click Add under Notes in Database.
The Add Note dialog box opens. Specify the section, description, and note text.
► Clique para exibir/ocultar parâmetros.
7 Click OK to add the note to the specified section and return to the Notes Manager: Callout dialog box.
8 Change the note description by selecting the description and clicking Edit.
The Edit Note dialog box opens. Deselect Use the first 42 characters, and then change the Description. You can also edit the note text and associate the note with a different section.
9 The text of a selected note can be edited in Note Text.
10 To search easily for a note, section, or description, use a filter. Only notes, sections, or descriptions with the specified text are displayed. Select the desired filter from the Database Filter list in the Notes Manager: Callout dialog box. To display all notes, sections, and descriptions, select All Notes. In addition, if no items match a selected filter, all notes are displayed.
11 To edit the database search filters, click Edit under Database Filter.
The Edit Filter List dialog box opens. The filters are listed in order.
► Clique para exibir/ocultar parâmetros.
12 Click OK to change the search filters and return to the Notes Manager: Callout dialog box.
13 Changes and additions to the notes database are saved automatically according to the preferences specified. Click Prefs to set these preferences.
The Database Preferences dialog box opens. Set the desired actions that automatically save database changes by selecting the associated check box. If no automatic saving is specified, you will be prompted frequently about saving the database.
The Locate and Hide Database options are available when editing a General Notes or Keynote Legend with database.
14 Click OK to return to the Notes Manager: Callout dialog box.
15 Once the desired note has been entered or located, select it and click Update to move it to the Callout Text list.
16 Click OK. The selected note is used for the callout text.
~~~~~~~~~~~~~~~~~~~~~~~~~
 Editing
a Database Callout
Editing
a Database Callout• To change the note text, either double-click the callout with the Selection tool, or select the callout and click Edit Note from the Object Info palette. The Notes Manager: Callout dialog box opens. Select a different note as described in Placing Database Callouts.
• Edit the database callout parameters from the Object Info palette as for an ordinary callout. See Inserting Callouts or Keynotes.
• Edit the graphics of a database callout as for an ordinary callout; see Editing the Callout.
• To convert an existing database callout into an ordinary callout, click Edit Note from the Object Info palette, and then click Hide Database Controls. The callout text can then be edited, and the database text is not affected.
• If there are several callout objects, use the Align/Distribute Leader Lines command to improve readability (see Alinhando e Distribuindo Linhas de Indicação).
~~~~~~~~~~~~~~~~~~~~~~~~~
 Placing
Database Keynote Legends
Placing
Database Keynote LegendsTool |
Tool set |
|---|---|
Callout
|
Basic |
Keynote legends can take advantage of a notes database.
To place a database keynote legend:
1 Click the tool and then click Preferences.
The Callout Preferences dialog box opens. As described in Inserting Callouts or Keynotes, select Place As Keynote.
2 Place the callouts in the drawing area.
3 Select the keynote legend. From the Object Info palette, click Edit Notes.
4 The Notes Manager: Keynote List dialog box opens.
5 If necessary, click Show Database Controls to access the keynote legend database parameters.
The dialog box is divided into two sections, with the database information on the left and the keynote legend information on the right. The buttons in the center of the dialog box move information from the database to the legend and vice versa.
► Clique para exibir/ocultar parâmetros.
6 Click OK to change the keynote legend, replacing the notes with database notes.
~~~~~~~~~~~~~~~~~~~~~~~~~
 Placing
Database General Notes
Placing
Database General NotesTool |
Tool set |
|---|---|
General Notes
|
Dims/Notes |
General notes can take advantage of a notes database.
To place a database general notes object:
1 Click the tool.
2 Click to place the general notes object in the drawing.
The Notes Manager: General Notes dialog box opens.
3 Click Show Database Controls to access the general notes database parameters.
The dialog box is divided into two sections, with the database information on the left and the general notes information on the right. The buttons in the center of the dialog box move information from the database to the general notes and vice versa.
A sample database is located in the Vectorworks application folder: [Vectorworks]\Libraries\Defaults\Notes\GeneralNotes.txt
► Clique para exibir/ocultar parâmetros.
The note in the Notes in the Selected General Notes Object list will be placed as a general note.
~~~~~~~~~~~~~~~~~~~~~~~~~
 Adding Text to a Database
Command |
Path |
|---|---|
Add Text to Database |
Text |
Text objects can be added from the drawing to a selected database. This is convenient for retrieving text from older, converted files for use with the Notes Manager or when adding frequently-used text to a database for easy future insertion as an annotation.
To add drawing text to a database:
1 Select the command.
The Add Text to Database dialog box opens. Specify which text objects to select and indicate in which databases to search for duplicated text.
► Clique para exibir/ocultar parâmetros.
2 Click OK. If any of the text is not found in the text search database(s), the Notes Manager: Add Text to Database dialog box opens.
3 The text to be added is listed on the right. As described in Placing Database Keynote Legends, the text can be added to the active database in the desired section.
~~~~~~~~~~~~~~~~~~~~~~~~~
 Reconciling Database and Drawing
Notes
Reconciling Database and Drawing
NotesCommand |
Path |
|---|---|
Reconcile Notes |
Text |
The Reconcile Notes command handles differences between the database and the notes in the drawing. For example, if database callouts have been placed and the database is edited afterwards, differences must be reconciled.
To reconcile notes:
1 Select the command.
The Reconcile Notes dialog box opens. Select the note objects to reconcile.
► Clique para exibir/ocultar parâmetros.
2 Click OK to reconcile the notes. If any of the notes reference databases, the Notes Manager attempts to locate those databases. It searches first in the same folder as the current file; if not found, it searches in the same place relative to the Vectorworks program executable. If the databases still cannot be found, the Notes Manager tries to locate them with fully-qualified paths.
Place database files from another user in the same folder as the drawing file so that the Notes Manager can easily locate the databases.
3 If a database referenced by notes cannot be located, the Cannot Locate Database(s) dialog box opens. For each database that cannot be located, click Browse to specify the database location.
4 Click OK. Next, the Notes Manager searches the database(s) for the notes.
5 If one or more notes cannot be located in the database, or are not from a valid database, an alert dialog box opens. Indicate whether you want to search for the notes.
If there are no additional database files to be specified, click No and proceed to step 8. If the notes could be located in another database, click Yes to specify the database location.
6 The Specify Additional Databases to Search dialog box opens. Click Add to specify additional databases where the notes are located. Click Remove to delete a selected database from the list. The number of notes which have been located is displayed.
7 Click OK.
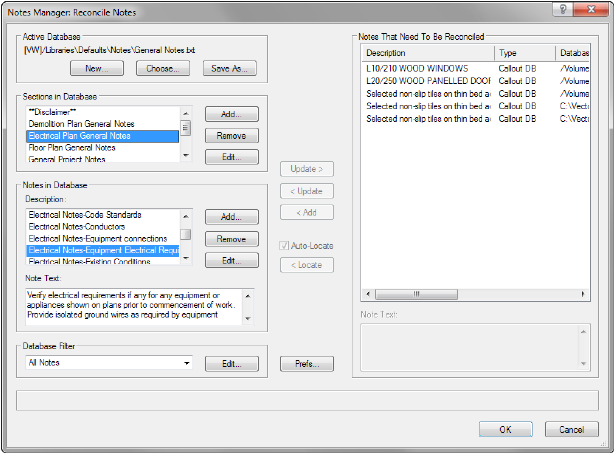
8 If some notes have still not been located, the Notes Manager: Reconcile Notes dialog box opens.
The dialog box is divided into two sections, with the database information on the left and the notes to be reconciled on the right. The buttons in the center of the dialog box move information from the database to the general notes and vice versa.
By using the center buttons, reconcile each note manually. As a note is reconciled, it is removed from the list.
► Clique para exibir/ocultar parâmetros.
When you click OK, an alert message explains how the notes were reconciled.
~~~~~~~~~~~~~~~~~~~~~~~~~
 Locating
Databases on a Network
Locating
Databases on a NetworkTo use databases efficiently in a multiple-user environment, the database files should be placed on a network. There, they can be accessed concurrently by several users who will then conform to office standards and will not need to retype notes.
On Windows, choose databases by browsing from the Network location rather than from a mapped drive letter. If you select databases from mapped drives, the database references are then dependent on drive mapping.
Database changes made by different users are merged automatically.
A conflict could arise if you and another user edit the same note in the same database at the same time. If this occurs, the Resolve Note Conflict dialog box opens when you close the Notes Manager dialog box.
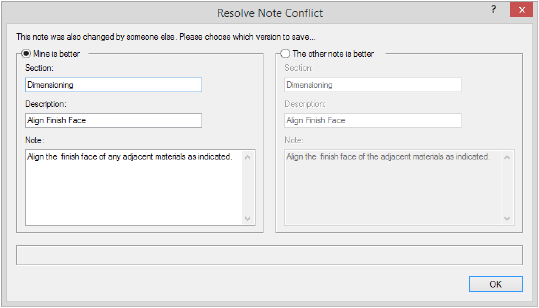
On the left, your version of the note displays, and on the right, the other user’s version displays. Select which version of the note to save by selecting Mine is better or The other note is better.
~~~~~~~~~~~~~~~~~~~~~~~~~
 Converting Notes from
Previous Versions
Converting Notes from
Previous VersionsCommand |
Path |
|---|---|
Convert Old Notes to New |
Text |
Databases created in previous versions of the Notes Manager are automatically converted to the current version when they are selected by clicking Choose to select a database.
Databases and notes created in Vectorworks versions prior to version 11 can be converted for use in the current version. Callouts created in those versions are automatically converted to the current format. They can be used as ordinary callouts, keynotes, or database callouts. Other notes objects, such as Text Notes, Keynotes, and General Notes created by previous Notes Manager versions, as well as Vectorworks text objects, must be converted. Vectorworks text objects are converted to general notes.
To convert old objects to the current format:
Select the command. The Convert Old Notes to New dialog box opens. Select the type of old notes to convert.
► Clique para exibir/ocultar parâmetros.
The Conversion Results dialog box displays a summary of the objects converted.
~~~~~~~~~~~~~~~~~~~~~~~~~


